
Settings
Anyland is a sandbox universe for VR & desktop (see Steam page). This page provides an overview of the dialog □□□ settings pages & more.
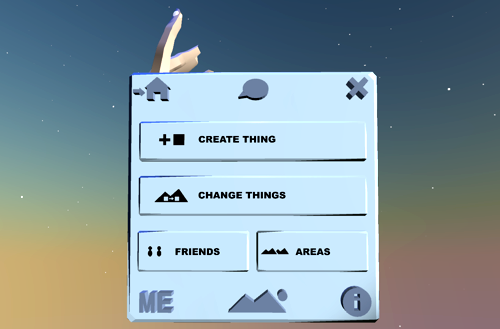
Thing settings
Get to these while editing a Thing and pressing the □□□ button.
Holdable Allows people to pick up and hold the thing when not in "Change Things" mode.
(Remains held until delete pressed) Will make a holdable automatically stay held in one's hands until one actively releases it again. This is a required setting if you want to script the "When triggered" action.
Clonable (by others) Allows others to edit a clone of your creation, while giving credit to you in the context-laser info. You can also allow this for all your creations via Me → "..." → "All my creations are clonable".
Climbable Makes your creation Climbable. In non-"Change Things" mode (for everyone who's not an editor in your area), people will only be able to teleport to vertical or ceiling objects if this is set.
Show center + direction Shows a line coming out of the front-facing direction of your creation during editing, useful for e.g. knowing where a script would emit something. Also note there's an "..." option for each Thing Part to "Show direction".
Invisible (when done) Makes this whole thing disappear when saved. Use Me-setting "See invisible" to always see them.
Uncollidable (when done) Disables collisions for this whole thing, except where "Dedicated collider" is used.
Sittable Provides a lowered position when teleporting onto. Can be useful for chairs, couches and so on.
Unwalkable Disallows the walk teleport laser to be used on this object. For instance, you can use this for areas you don't want people to go to.
Bouncy (when thrown) Makes Holdable things that are thrown bounce more when colliding with another object.
Floats (when thrown) Make this object fly when held and thrown, unaffected by gravity (also see the Area setting "Zero Gravity", which enables this for all objects).
Slidy (when thrown) Makes thrown holdables slide when on surfaces.
Shatters (when thrown) This will make a thrown Holdable break when it collides with another object. Useful for e.g. glasses or other things that are meant to be destroyed when hitting another object.
Sticky (when thrown) Thrown Holdables or emitted things will remain stuck at objects they collide with.
Show if far away too Very big Things or those using e.g. "tell any" already show even when far away, but use this when a Thing isn't showing properly. Alternatively, click "Show at..." on the backside of the Placement dialog backside.
Amplify speech (when held) Have one's voice be heard area-wide at any distance when the Thing is held or eaten. Can be disabled via area placements using "When starts then disallow amplified speech". Note when your speech gets amplified, you'll see an alert dialog, and can then disable the amplification again on your Me dialog.
Surround sound Sounds played from this thing will be hearable in all of the area even at far distances (also see the "surround" keyword for play and loop commands).
Replaces hand (when worn) This hides the hand when attached to the arm sphere.
Add current body (when worn) When someone puts this on as head, your current body will be auto-worn with it. When edit-cloning your currently worn head, the head position will also auto-adjust. Body parts you have empty now will clear existing parts when wearing.
Stricter physics syncing Extra-strictly synchronizes the object for everyone when it's thrown or emitted. Useful for e.g. a dice roll. Also increases the object's lifetime from 30 seconds to 2 minutes. (Use with care, may add syncing flicker & lag.)
Movable (by everyone) Allows moving this in non-"Change Things" mode (e.g. board game pieces). Position resets if all left, on "reset area" command, or moving item in "Change Things" mode. Click both hands in air to move stacks (shaking shuffles).
Thing More settings
Get to these while editing a Thing and pressing □□□ → More.
Replace same in area When Done, changes all other placements of the Thing in this area to the new version.
(... one-time) Like "Replace same in area", but the setting itself will not remain selected for the saved version.
Invisible to me when worn Makes the Thing invisible (to yourself only) when you wear it. It still reacts to collisions for you. When putting it on, look into the mirror to see if it's showing for others. Heads have this behavior by default.
Can pass through Lets the teleport laser pass through (and allows moving through in desktop mode) while still able to get touch events. Also, thrown or emitted things won't collide with it. Also see attribute "Uncollidable".
Always precise collision You can use this if e.g. hollow things, like chests, don't properly collide, though it makes Things count against area limits faster.
Snap parts to grid Snaps all parts to the 0.5 meters grid. You can enable showing grid lines in the Me → "..." settings.
Add current body (non-clearing) Same as "Add current body when worn", but body parts you have empty now will be ignored and not clear existing parts when wearing.
Doesn't cast shadow Will have no part of this creation cast any shadow onto other objects.
Doesn't receive shadow Will have no part of this creation receive any shadow from other objects.
Avoid auto sounds Avoids automatic sound effects for attributes like Bouncy or Shatters.
Avoid auto haptic feedback Avoids automatic controller vibration for situations like triggering a holdable emit.
Floats on liquid Treats other placed parts set as Liquid like non-Liquids. For instance, a thrown ball now bumps off of water instead of being absorbed by it. Does not affect behavior towards thrown, emitted or held liquids.
Keep size in inventory Will not down or upscale from its original size when placed in inventory.
Active in inventory Triggers events like Start even when in the inventory.
Invisible to cameras Will not show the Thing on desktop streams of custom cameras.
Personal experience Scripted personal events like "When consumed" or "When touched" are not synced to others around for any parts of this Thing or its Sub-Things, appearing for that person only. Note this is also available as setting for individual Thing Parts.
Never clonable Makes this item non-clonable even when your Me-settings use "All my creations are clonable".
Also merge parts that may cause issues Merging is enabled by default, so you normally don't need this setting. If you however find that normal rules didn't merge your creation, try this to always merge same-color parts to help optimization.
Thing settings backside
Get to these while editing a Thing, pressing □□□, then turning around the dialog.
Description Lets you add a descriptive text for the creation. This could be a tip, usage info, extra credits, creator's commentary, or anything you may need. The description will show as expanded top of the Thing context dialog when someone later lasers it. (You can also see all placements in the area which contain descriptions via the Highlight dialog.)
Split off completions This lets you break the coupling of automatic symmetrically mirrored parts, turning them into separately movable ones.
Create dialog backside settings
Get to these while editing a Thing, then turning around the main create dialog.
Snap angles Snaps angles in 90 degrees steps. Useful for aligning parts during creating, as well as moving walls, tables and such when done.
Soft snap angles The same as snap angles, but for 22.5 degrees steps.
Snap position More precisely aligns parts. When moving or pulling out a part, it will keep onto the main axis you move it along.
Scale all parts Will scale the whole thing equally when you resize.
Scale each part uniformly Will keep the proportions of each individual part you resize. For instance, if you want to keep a sphere shape you added perfectly spherical.
Finetune position Helps you make minimal part movements as you adjust your creation.
[Symmetry buttons] Will automatically add reflective parts (sideways; vertically; and into the depth) for part you add.
Thing Part settings
Get to these while editing a Thing, then context-lasering a Thing Part, then pressing □□□.
Liquid Makes this part of your creation be a liquid, like water which one can swim in. Also, holdables will disappear when thrown into liquids.
Scales uniformly Will make this part of your creation resize proportionally to its original size. You can also enable this for all parts of the creation at once by using the "Scale each part uniformly" option on the backside of this dialog.
Unsoftened animations By default when a part transitions from one state to another, it will slightly ease out and in for a smoother movement. When enabling this option, no such smoothing is used.
Persist states Prevents automatic reverting to the first state after 30 seconds, remaining on the set state (until everyone leaves the area, or the state is otherways scripted to change). Note too much of this attributes can risk adding lag to the area or body.
Invisible (when done) Makes the part disappear when saved but still trigger script events. Use Me-setting "See invisible" to always see it.
Uncollidable (when done) Disables collisions for this part.
Dedicated collider Sets Thing to be generally Uncollidable for all parts, but ensures this part is collidable. This can optimize & speed up physics.
Use as sky When placed, shows this part's material and texture layers on the sky (including animations). Use the inner glow base material to get the fullest visible background color. At most 1 placement is active per area.
(Stretch sky seams) Uses a different type of sky tiling, stretching the pattern at the seams.
Camera Streams from the object to nearby Video Screens when activated, like when context-lasered. You can also create a Camera button using the "More" → "Camera button". Also see the "then stream" scripting command.
Slideshow screen When later context-lasered, offers a "Slideshow" button to play image search results, useful for e.g. reference images while creating. You can also create a Slideshow button using "More" → "Slideshow button".
Show direction Shows the Part's center and forward and upward direction when editing. For instance, this can help when the part has Sub-Things, or uses the "tell in front" command.
Make center Sets the Thing's position & rotation center to the current position & rotation of this part. You can use Thing setting "Show center + direction" to see the current center.
Center-align text
Use this to automatically center-align a text.
(This option only shows if the Part is of the text type.)
Right-align text
Use this to automatically right-align a text.
(This option only shows if the Part is of the text type.)
Text line height
Adjusts the spacing between text rows, e.g. 0.5 to bring them closer. The default is 1.
(This option only shows if the Part is of the text type.)
Thing Part More settings
Get to these while editing a Thing, then context-lasering a Thing Part, then pressing □□□ → More.
Snap parts to this angle Makes all other parts of this thing snap to this rotation when moved.
Snap parts to this position Makes all other parts of this thing align to this position when moved.
Fish eye camera Similar to the Camera option, but with a wider Field of View (FOV, becoming 120 degrees instead of the default 60).
Loosely coupled particles If this part emits particles, they will after being emitted not move as strictly connected to the part anymore.
Omit auto-sounds Stops automatically playing sounds like whooshing when something is emitted, when one is transported and so on.
Personal experience Scripted personal events like "When consumed" or "When touched" are not synced to others around, appearing for that person only. Note this is also available as setting for the whole Thing.
Snap texture angles When applying texture materials to this surface, their rotation will snap to steps of 22.5 degrees.
Texture scales uniformly When applying texture materials to this surface, they will scale proportionally when resized.
Doesn't cast shadow Will have this part of your creation not cast any shadow onto other objects.
Doesn't receive shadow Will have this part of your creation not receive any shadow from other objects.
Light omits shadow If this part is using the Light emission material, it will not cause shadows. This may help optimize speed. Also see the Area setting "Sun omits shadow".
Shows image pastes When pasting an Imgur URL using Ctrl+V, shows it on a body part or held item of oneself.
Allow black image backs If not ticked, fully dark shapes with images will automatically become white when loaded to make the image visible.
Invisible to me when worn Makes the part invisible (to yourself only) when you wear it. It still reacts to collisions for you. When putting it on, look into the mirror to see if it's showing for others.
Name... Names this part. Can be changed via the "call me" command. A few default part names are available via the keyboard auto-completion (they may help with future controllers like Valve Knuckles, or when exporting the creation Json for import elsewhere):
thumb
index finger
middle finger
ring finger
little finger
hand grip
hand grab zone
eyelid
mouth
animation
Thing Part Auto-Complete
Get to these while editing a Thing Part, then context-lasering it, then clicking □□□ → Auto-Complete.
Parts This slider adjusts how many parts will be used for auto-completion. (Also see the "More Parts" option on the backside of the dialog.)
Waves Adjusts the number of waves used for the auto-continuation.
Random X Randomizes the X axis position for the auto-continuation.
Random Y Randomizes the Y axis position for the auto-continuation.
Random Z Randomizes the Z axis position for the auto-continuation.
Random Rotation Randomizes the rotation of parts for the auto-continuation.
Random Size Randomizes the scale of parts for the auto-continuation.
More Parts (on the dialog backside) Tick this to get a higher parts count slider for the auto-completion, up from default 100 to 500. (Please note this may add lag.)
Thing Part Screen
Get to these while editing a Thing, then context-lasering a Thing Part, then pressing □□□ → Screen.
Is screen (for video & web) Means the part then can be context-lasered to play videos & show web pages. It will then also receive nearby "show video [url]" and "show web [url]" commands.
Surround sound Videos played on this will be at full volume at any distance. They will lose the 3D effect.
Loops Videos played (and auto-played) on this screen will loop endlessly.
Mirror left right Flips the camera stream or video horizontally, useful for e.g. camera streams to make mirrors.
Area dialog
Get to these by clicking the Mountain + Sun icon on the main dialog.
The area dialog contains buttons to reach the Settings, the Copy & Paste dialog, and the current area's Sub-Areas. You'll also find the amount of unique all-time visitors the area had so far.
From this dialog, you can also toggle different environments (like sunny with birds chirping, or snowy with snow particles). Some environments come with their own gravity settings (but you can also tune the area gracity freely via the "set gravity" command).
To the right of the dialog are some environment shapes, allowing you to adjust the sun, night sky, environment light, clouds and fog. You can also use the color pen to colorize these, and resize them.
At the top of the area dialog, you can click the star button to favorite the area. It will then be accessible by clicking on the same star icon from the Areas dialog.
The area dialog also lets you change the area's description, which will be shown in e.g. area search results. Keywords used in descriptions also count equally for search results as titles.
Area settings
Get to these by clicking the Mountain + Sun icon on the main dialog, then pressing □□□.
Private Only the area's editors or (temporarily) people you ping can join private areas. They will also not show in the areas dialog default suggestions, the friends list, or non-editor search results.
Zero gravity Thrown things float, and people can teleport up walls or into air.
Floating dust Adds floating particles swirling around in the area.
Copyable Allow others to copy & paste all area placements into their own area. Credit will be given in the area dialog.
Only owner locks things Will only allow you as original creator of the area to add or remove placement locks, which disallow moving or deleting a Thing.
Make my home
Makes this area your starting area when you launch Anyland.
(This option only shows when you're the creator of the current area, and when it's not already your home.)
Unlisted Will not list the area in the areas dialog default suggestions, search results, friends list and so on (while still allowing non-editor visits via e.g. teleports). Note Unlisting isn't needed if the area is already set to Private.
Only editors change screens (temporarily) Until everyone left, only editors can access video search & controls, or change the content of web screens.
Only editors use inventory (temporarily) Until everyone left, only editors can take items out of their backpack inventory. Everyone can still use Holdables that were placed in the area.
Sun omits shadow The area light will not make objects cast a shadow if set. This can help optimize area display speed. Also note individual lights have a Thing Part More setting to omit shadows.
Area dialog backside
Get to these by clicking the Mountain + Sun icon on the main dialog, then turning around the dialog.
Highlight This button opens the Highlight dialog, where you can show a bright outline on specific items in the area. For instance, you can highlight the 25 newest placements, or locked placements.
Export The export button (a square with an arrow pointing out of it) lets you export the area into a local OBJ (Object) and MTL (Material) file, which you can then import again into a 3D editor to do anything with it. The folder containing the OBJ file (which is named e.g. "bluecastle-2019-10-21-08-01-02") will be opened automatically for you on desktop. For instance, you could use your area as a backdrop for a Unity game you're selling on Steam. Note that only creations you made, or which were set Clonable, will be exported.
People here now The button showing 3 people will opens the "People here now" dialog, which shows current people in the area, as well as people you recently saw in the area. One use of this dialog is to understand who was just in the area and then left, so you can still know their name and open their profile.
Area Rights
Get to these by clicking the Mountain + Sun icon on the main dialog, then pressing □□□ → Rights.
Here you find information on the currently set area rights (like "Allow emitted climbing" or "Any person size"). See the "then allow/ disallow" command overview for more.
Area Filters
Get to these by clicking the Mountain + Sun icon on the main dialog, then pressing □□□ → Filters.
While the filters dialog shows, edge shade & bloom show in VR too. You can also have them always show by enabling "Extra effects in VR" in the Me More settings.
Light Bloom Adds a type of glow around brighter objects.
Saturation Increases the color strength.
Contrast Increases the contrast in the area.
Brightness Makes the area brighter or darker.
Color Groups Sorts colors into color buckets, giving a cartoony, analog, low-fi or retro effect.
Hue shift Changes all colors along the color wheel. For instance, red may become blue.
Distance tint Adds a blueish color the further something is towards the far horizon, something we can observe in natural light too.
Inversion Inverts the colors, so black turns into white and so on.
Heat Vision Creates a type of heat or night vision effect in the area.
Area Copy & Paste
Get to these by clicking the Mountain + Sun icon on the main dialog, then the copy & paste button slightly down from center.
Copy Copies all placements of the current area. This only shows if you're the owner of the area (the one who originally created it), or the owner has set it to be Copyable.
Paste Copies all placements of the current area.
To avoid the security word to be entered when pasting, delete everything from the area first... e.g. context-laser the rock ground, hit Delete on your controller, then press then press the Delete button that appears.
Find copyable areas This shows areas which were set to be copyable by the owner. You can always add the keyword "copyable" to any search to restrict it to copyable areas only. These can serve as e.g. a starting template for your own area.
Highlight dialog
Get to these by clicking the Mountain + Sun icon in the main dialog, turning it around, and hitting the "Highlight" button.
Newest Highlights the most recently placed things in the area.
Oldest Highlights the oldest placements made in the area.
Top 25 by part count Highlights the Things with most Thing Parts (after merging).
Top 25 around by part count Highlights the Things with most Thing Parts (after merging) nearby where you are.
Lights Highlights light sources in the area.
Locked Things Highlights placements which were locked by an editor in the placement context dialog.
Unlocked Things Highlights placements which are not locked in the placement context dialog.
Unwalkables Highlights Things set to be Unwalkable.
Climbables Highlights Things set to be Climbable.
"Show if far away" Things Highlights Things using the "Show if far away too" attribute.
Clonables Highlights Things which the creator made clonable, to be edited by others.
Holdables Highlights Things which can be picked up by area visitors in non-"Change Things" mode.
"Send to" Things Highlights placements containing teleporting scripts, like "then send nearyb...".
Rights-setting scripts Highlights placements containing scripts with "then allow/ disallow" commands.
Tell any/ nearby scripts Highlights placements containing "then tell any/ nearby" scripts.
Attached to people Highlights the bodies of people.
Named Things Highlights Things which were given a name that's not just "Thing".
Things with description Highlights Things which were given a text description. Descriptions show in the placement context dialog.
Emitters Highlights Things which emit something, like cannons.
Particle emitters Highlights placements which emit particles.
Special "Show at" distance Highlights placements which, via the placement context dialog backside, were given a special "Show at..." meters value, overriding their default distance showing behavior.
Video/ slideshow related Highlights Things that contain screens for video, browsers or slideshows, or buttons which start those.
Surround sound Highlights Things, like screens, using the "Surround Sound" attribute.
Sound tracks Highlights Things which use the "play track" script command to play background music for the area.
Used as sky Highlights Things used to determine what the area's sky texture looks like.
Included Sub-Things Highlights Things which make use of Included Sub-Things.
Placed Sub-Things & Containers Highlights Things which are Placed Sub-Things, or move them (see the back of a part's Sub-Thing dialog).
Everything Highlights every object in the area.
Name contains... Highlights objects whose name contain a certain string specified by you, e.g. if you enter "red" it would show things named "red tree", "fred" and so on.
Areas dialog
Get to these by clicking "Areas" from the main menu. You can turn it around for more info.
On this dialog, you will find teleport buttons for an automatic selection of areas (based on different "signal buckets" like newly popular, currently lively, all-time popular and so on). You'll also be able to see your starred area favorites, your created areas, and your visited areas. The dialog backside will also show how many people are currently in Anyland (similar to in.anyland.com) and how many created areas there are in the universe, and how many of these are set to be public.
Click on the Created Areas forward pager to also see the Sub-Areas of the current area.
If you don't want your area to show as default suggestion on the Areas dialog (unless it's currently lively), you can tick the Unlisted option in the Area settings (this option only shows up if you're the area owner.
Me settings
Get to these by clicking Me, then □□□.
I'm findable Being Findable (on by default) means that your area shows next to you in the friends dialog to people who added you as a friend (which they can do even if you didn't add them as friend yet). It also means your name will show on in.anyland.com, which lists people currently in Anyland. If you set yourself to be unfindable, people can still see you normally if they're in the same area, they just won't be able to track down where you currently are.
Fly (as editor) Lets you move into air when creating or changing things.
See invisible (as editor) Lets you see objects marked as "Invisible" even when not creating.
Touch uncollidable (as editor) Lets you touch objects marked as "Uncollidable" even when not creating.
Lower quality graphics If you get graphics speed issues, you can try this to disable shadows, some lights & more.
Smooth walk motion Smoothly moves when teleport-walking. Please note this may make you motion sick.
Smooth riding on things When walking onto moving sub-things, you will move with them smoothly instead of in an interval. Please note this may make you motion sick.
All my creations are Clonable Allows others to clone-edit your creations even if "Clonable" wasn't set (except items you set to "Never clonable"). This can be toggled on & off anytime, and doesn't make areas clonable. Credit to you is given when context-lasering the clone.
Stop pings & alerts Stops receiving pings or newborn alerts. For instance, this can be useful if you're currently screen-recording for a video and don't want to have a dialog interrupt anything.
Find Optimizations Adds unmerged Body Thing Part count & script messages per second to name tags, as high counts can add lag (context-laser someone to make name tags reappear). Also emits a red "-" at high-message sending Things.
Strictly synchronized parts can increase messages per second, like those using variables, the "Persist States" attribute, text-setting commands, turn commands, state names via "call me", placed browsers, the attract/ repel commands, or movement of placed sub-things.
Show grid lines Shows grid lines at each 1 meter, with indicators for half meters. (Clicking "Grid size" below changes the size.)
Snap things to grid Lets you snap things to the grid. (Also see this video tutorial.)
Grid size: ...m Sets a grid size in meters for the "Show Grid Lines" and "Snap to Grid" options, e.g. "2.5". Default is 1m, maximum is 1000m.
Me settings backside
Get to these by clicking Me on the main dialog, then □□□, then turning around the dialog.
Creation Tools... Clicking this opens information on your current Creation Tools (payment) status.
Me More settings
Get to these by clicking on the ring, then Me → □□□ → More.
Helper lights On by default; activates a head lamp so you can see even if the area is completely dark.
Mute videos Turns off the sound of all videos for this session, but just for you.
Snap thing angles Snaps the angles of all Things when you move them, even if a Thing wasn't set to angle-snap.
Snap thing positions Snaps the position of all Things to align with where you started dragging them, even if a Thing wasn't set to position-snap.
Disable all snapping Overrrides individual Thing snapping settings to not snap when moved.
Stop scripts (as editor) Suppresses Thing Part commands if you're an editor of the area. This can be useful to stop an animation so you can catch something that's moving fast, or maybe you want to debug a problematic script.
Show Frame Rate Displays the FPS (Frames per Second) to analyze lag. A value of 90 is 100% smooth while lower values may indicate optimization need in the area, or a higher-powered PC.
Extra effects in VR Edge shade & bloom are by default only active in desktop mode, but with this setting they show in VR too. (Depending on the area and computer, this may lag a lot.) This option can be picked after your first 24 hours in Anyland. Please note edge shade can currently sometimes cause an unnatural glare.
Nearby Limits These buttons let you adjust the number of nearby placements, lights, and shade-throwing lights. A distance optimizer will dynamically enable and disable objects as you go, and you can tune the default settings for the duration of the session here, especially helpful to probe optimization limits.
Walk laser auto-targets ground When directing the teleport laser forward and nothing is hit, it will automatically try to target the ground. This can be useful for certain seating positions or when your hands are on the table.
Disable Thing merging Temporarily keep all thing parts in areas unmerged. This slows down everything but can help you adjust otherwise untouchable placements.
I'm invisible (where allowed) Makes you invisible to others if the area uses an "Allow invisibility" placement command.
Create in Desktop Mode Adds the "Create Thing" button in desktop mode too, allowing limited creation for e.g. scripting or testing.
Windowed mode Switches Anyland on desktop from fullscreen to windowed, and remembers the setting for next startup. You can also press Alt+Return to switch.
Legacy Controls
This button shows when you're using Oculus Touch controls.
It switches between the two different settings:
[Oculus Legacy] X/A: Teleport, Y/B: Context, Thumbstick-Up: Teleport, Thumbstick-press: Delete.
[Default] X/A: Context, Y/B: Delete, Thumbstick-Up/ Thumbstick-Press: Teleport.
Demo mode Useful for letting others try creating at a specific spot, this disables moving, home button, context-lasering placements, the area dialog and forums. When going to another area, demo mode automatically ends.
Highlight lasered Things When context-lasering Placements, shows a highlight color around them for better recognition.
Show Errors Displays possible app errors in front of you and copes them to the clipboard. You normally don't need this, but for instance can use it to tell us more about an error.
Clear cache Clears your local Things cache. Your specific local path will be shown in the (i) help for this button.
Lock features... Disables certain features, useful for e.g. demoing to a group. When clicking this, a local Json (JavaScript Object Notation) file opens on your desktop, containing the following (all the default values are shown):
{
    "ringMenu": true,
    "createThings": true,
    "changeThings": true,
    "areaDialog": true,
    "boards": true,
    "friendsDialog": true,
    "areasDialog": true,
    "meDialog": true,
    "profileDialog": true,
    "quitButton": true,
    "pingAlerts": true,
    "newbornAlerts": true,
    "teleportLaser": true,
    "contextLaser": true,
    "homeButton": true,
    "helpDialog": true,
    "createArea": true,
    "visitedAreasList": true,
    "createdAreasList": true,
    "favoritedAreasList": true,
    "webBrowsing": true,
    "hapticPulse": true,
}
For instance, setting "createThings" to the value "false" (no quotes) will mean that one cannot create, or see the Create Things button on the main menu, nor enable this feature again from within VR (it will require PC/ desktop access again). Setting these values can be useful for e.g. setting up demos, where you don't want participants to have all features and rights, or it can be used in a VR arcade setting.
To reset the file to all the default values, you can just delete it, and restart Anyland. It will be recreated upon launch.
Reset guidance Temporarily clears all personal achievements so you can test again what guidance the dialogs offer when one e.g. never created something, never clicked on help and so on. (Restart Anyland to load your actual achievements again.) For instance, it will show the following help texts on the Create Dialog, in this order of achieving them:
"Click shapes with finger tip & drag into world"
"Resize by pressing both triggers in mid-air"
"Hold & drag out with other hand to duplicate"
"Press grip to delete something" [On Oculus: "Press x or a to delete something")
Also, the (i) info button will blink after creating one's first item, and before clicking it once.
Reset legs Resets the position and rotation of your leg spheres/ attachments to their starting default.
Me dialog backside
Click on "Me" from the main dialog and turn the dialog around.
Extra Mirrors Click this to enable & disable for the session two side view mirrors, and one back view mirror, to better see your whole body. (Please note the extra mirrors may add a bit of lag.)
More: The backside also shows stats on how many days ago you were born/ registered; how many body parts you have attached; how many body parts use strict-syncing; and how many synchronization messages you send per second (also see the optimization checklist.
Board settings
Get to these by clicking the speech bubble icon at the top of the main dialog, then a forum you created, then pressing □□□.
Favorite Whether or not this forum shows up in your forums overview.
Rights settings
Editors can moderate
Only Ed. [Editors] add topics (+All above)
Only Ed. [Editors] add comments (+All above)
Only Ed. [Editors] can read (+All above)
Create Board dialog Lets you add a new custom forum (you can also give the forum a custom dialog shape later)
Board thread settings
Get to these by clicking the speech bubble icon at the top of the main dialog, then a forum you created, then a specific thread, then pressing □□□. You need to be editor for the forum.
Stickify topic Will slightly change the color of the thread button, and ensure that the thread is always listed at the top of the forum.
Lock topic Enable this so that no one can add new comments to the thread.
Delete topic Will remove the thread and all comments made in it.
Clarify title Lets you append a clarification to the thread's title. For instance, if the title is "Help" you could clarify to "Help [How to make something Holdable]".
Microphone settings
Get to these by clicking the ring dialog → Me → Microphone. While this dialog is open, you can hear your echo to confirm the mic is working as it should.
[Specific microphone name] Switches to use this mic device for voice chat.
Mute Me Will not record anything from your microphone. Use this to mute yourself from voice chat, so others can't hear you.
Camera stream settings
Get to these by clicking the ring dialog → Me → Camera icon (while in VR mode).
When starting Anyland, to get back your last tuned settings, just open this dialog again once. A "Loaded" message in green will appear.
Camera position modes
The following camera modes are available:
Own view (default)
Own recording-optimized view
View from behind me
View from further behind
Bird's eye
Looking at me
Left hand
Right hand
The "Own recording-optimized view" mode shows a bigger, more appropriate scope on the desktop stream (though as any other special setting for the stream, it also creates a secondary camera to render, so may not be as performant as "Own view").
Follow modes
Follows instantly (default)
Follows smoothly
Follows very smoothly
Doesn't follow
Stabilize to horizon Aligns the camera to the horizon for a more stable view
I'm invisible Makes yourself invisible to the camera
(... except hands) Still shows your hands even when you enabled the "I'm invisible" option
Fish eye wide scope Switches to a wider Field of View (FoV) of 120 degrees instead of the default 60.
Reset Resetting the desktop stream settings will switch all back to default (this is also the most performant setting, as it won't require a secondary rendering to be calculated, but instead just reuse the VR rendering).
Optimize for recording A quick way to set all options to a good starting mix for recording videos or streams. It activates "Own recording-optimized view", "Follows smoothly" and "Stabilize to horizon", and deactivates everything else. You can then still fine-tune for recording based on your preferences.
Placement backside
Get to these by context-lasering a placement (while not being in creating mode) and turning around the dialog.
Enabled... This will open the Enabled dialog, where you can suppress certain things like the placement's scripts. (You need to be area editor to see this button.)
Copy & Paste Lets you individually copy & paste the placement's current position, rotation, and size.
Show at... Here you can set the distance in meters at which area placements are active and shown (visibility always dynamically updates as you move around to optimize speed). If you enter nothing or just close the input dialog, the default will be used. Otherwise your meters value will be used to force-hide or force-show the placement. Lights which force-show will also be made to shine.
Export Exports the Thing (if it's made by you, or Clonable) into an OBJ (Object) file, along with an MTL (Material) as well as a Json Thing file. You can then re-import the file into other programs, like Blender or Unity, to do anything you want with them (like use the creation for a game you sell on Steam). Also see the area export feature on the back of the Area dialog.
Placement's Enabled settings
Get to these by context-lasering a placement, and turning around the dialog (you need to be area editor to see this).
Scripts & States When off, removes all scripts of this placement and reduces to a single cell only. This can help with optimizing the thing merging.
Collisions When off, makes this placement uncollidable, which can help with optimizing area speed, especially if the thing has many parts.
Lights When off, removes all lights from this placement.
Particles When off, removes all particles from this placement.
Holdable Settings When off, turns holdables into non-holdables.
Show if far away When off, suppresses special showing of the placement even from far away (which happens if it's e.g. very big, includes Placed Sub-Things, or uses "Show if far away too").
Disabling placement features can remove unwanted effects & optimize area speed, even when you can't edit the creation.
Thing Tags
Get to these by context-lasering a placed Thing and pressing Tag, then closing the keyboard that pops up. The dialog will show tags you added, as well as tags others added (provided those tags by others contain same-tag matches). You'll also see how many tags you ever for all things combined.
Unlisted By default, every thing that was placed in a public area at some point (and is still placed somewhere) will appear in universe-wide searches from the inventory. Unlisted things however will never appear. Only you as creator can toggle this.
Twitch settings
Get to these by pressing Me → Camera icon → Twitch. (Or in desktop mode, just pressing Me → Camera icon.) By setting these up, a dialog containing the chat messages from a live Twitch channel pop up on your arm. This can be your own Stream, or someone else's.
Your nickname Set your Twitch account name here.
Channel name Set your Twitch channel name here, or the channel name of someone else to observe their stream's chat.
Authentication string This verifies your Twitch account with Anyland via twitchapps.com/tmi/
Show chat Shows the chat on your arm. Enabled by default.
Alert when message arrives Plays a sound when people post new messages into the chat.
Guiding commands... By default, anything in the chat preceded with "!" will be sent into the area as Tell command. This button opens a dialog where you can enabled Twitch chat guiding commands. Just click the "Allow" checkbox on the guiding dialog to enable. The Twitch commands are:
| Typing ... | ... results in |
|---|---|
| !forward or ^, w | Move a step forward |
| !backward or v, s | Move a step backward |
| !left or <, a | Turn left by 45 degrees |
| !right or >, d | Turn right by 45 degrees |
| !up | Moves up if zero gravity/ editor |
| !down | Moves down if zero gravity/ editor |
| !turn | Turns by 180 degrees |
| !areas | Lists some areas |
| !to somearea | Sends to area named "somearea" |
| !to random | Sends to a random area |
| !to people | Sends to lively area if possible |
| !mirror | Briefly show mirror |
| !help or help | Show commands help |
→ Also see the Scripting Reference and Optimization Checklist
→ Have Questions, Suggestions & Feedback? Please post in our Steam forum!
This page is in the Public Domain.